Setting up a video wall can be like piecing together a giant puzzle that lights up. Whether creating an eye-catching display in a store, setting up a command center, or making the most incredible home theater, getting your video wall mounts right is key. Let’s jump into how to nail it with Smart Media Solutions’ gear and ensure your big picture looks fantastic from day one.
Do: Plan Your Space
Do take a good look at where you want your video wall. You need a big spot where everyone can see it without having to squint or crane their necks. Think about where people stand or sit and what you’ll show on the screens. It’s like finding the perfect spot for a painting, but this one will be a lot bigger.
Don’t rush into drilling holes without measuring everything twice. You don’t want to eyeball a video wall and hope for the best.
Do: Know Your Video Wall Mounts
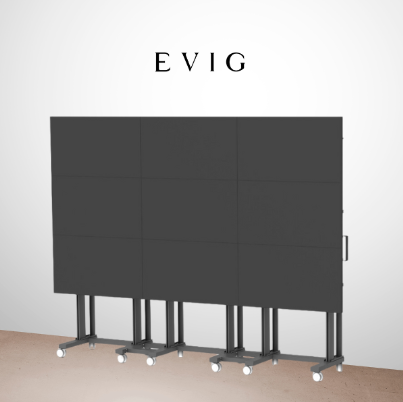
Do get to know the video wall mounts you’re using. Smart Media Solutions has a couple of fantastic options. Their Multi Display Wall lets you line up screens big or small, right next to each other for that seamless look. And if you want it super sleek, their Multi Display Wall + is all about getting those screens to kiss edge-to-edge perfectly.
Don’t just grab any mount and start hanging. Each mount has its superpowers, and you want to ensure you’re using them to your advantage.
Do: Get the Right Tools
Do make sure you have all the tools and bits you’ll need before you start. There’s nothing worse than having your project half-finished and realizing you’re missing that one weird screwdriver. Smart Media Solutions sends you everything in a box, but double-check you’ve got your basics ready too.
Don’t skimp on quality tools. It isn’t the time for that dollar-store screwdriver to shine. You want your tools to be as reliable as your mounts.
Do: Call for Backup
Do enlist a friend or two to help. Lifting screens and ensuring everything is level is a two-person (or more) job. Plus, it’s just more fun with company.
Don’t try to be a superhero and do it all alone. Even if you’ve got the strength, an extra set of eyes can save you from a wonky installation.
Do: Take It Step by Step
Do follow the instructions step by step. Smart Media Solutions makes it easy with a three-step setup. It’s tempting to skip ahead, but every step is there to make sure your video wall looks flawless.
Don’t rush. Good things take time, and an impressive video wall is a good thing.
Do: Check Your Work
Do step back and check your work as you go. Make sure everything is aligned and level. Minor adjustments early on can save you big headaches later.
Don’t wait until you’ve got all your screens up to realize something’s off. Catching a mistake early is easier than fixing it when you’re almost done.
Do: Enjoy the View
Do take a moment to admire your work once you’ve set your video wall mount. A video wall is a big project, and getting it right is something to be proud of. It’s time to crank up your favorite content and see it come to life on your new, flashy setup.
Don’t forget to relax and enjoy. You’ve earned it after all that planning, lifting, and aligning.
Wrapping Up
Mounting a video wall doesn’t have to be a daunting task. You’re all set to create an impressive display with the right planning, tools, and video wall mounts from Smart Media Solutions. Remember, taking the time to do it right the first time means you get to enjoy your video wall without any do-overs. So cut the cords, light up your screens, and let the show begin!